Protocolo Western blot
Western blotting is a widely used technique for detecting specific proteins in complex biological samples. This method involves protein separation by SDS-PAGE, transfer onto a membrane, and detection using antibodies. It is an essential tool in molecular biology and biomedical research for analyzing protein expression, modifications, and interactions.
Step-by-Step Protocol
1- Sample Preparation
Prior to performing a western blot, it is necessary to ensure that the protein of interest is available for antibody binding. This typically requires preparing a lysate to release the protein from cells or tissues. The lysate can be divided into multiple aliquots mixed with a loading buffer and stored at -80 °C until needed.
- Lyse cells or tissues using RIPA buffer supplemented with protease and phosphatase inhibitors.
- Sonicate or vortex samples to ensure complete lysis.
- Centrifuge at 16,000 g for 20 minutes at 4°C to remove debris.
- Transfer the supernatant to a new tube and measure protein concentration using BCA or Bradford assay.
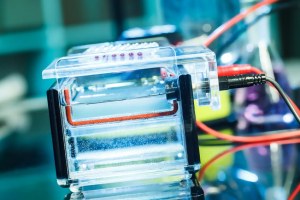
2- SDS-PAGE Electrophoresis
The gel is immersed in buffer, the protein samples are loaded, and an electrical current is applied to the gel, which causes proteins to migrate from one end of the gel (negative electrode) to the other (positive electrode). Proteins are separated by size; smaller proteins travel more quickly through the gel, so appear further down. To confirm the size of each protein in your sample, they are run alongside molecular weight ladders.
- Prepare a 10–15% polyacrylamide resolving gel and a 4% stacking gel.
- Mix 20 μg of protein sample with Laemmli buffer.
- Boil 5 min at 95°C, then spin the tubes.
- Load equal volume of proteins into the wells of the SDS-PAGE gel (acrylamide%depend on the size of the target protein), not forget a well for control weight ladders.
- Migration at constant amperage with appropriate buffer.
3- Protein transfert from the gel to the membrane
Once electrophoresis is complete, the proteins are transferred (or "blotted") onto a membrane for subsequent antibody incubation. The membrane can be made of nitrocellulose or polyvinylidene fluoride (PVDF), both of which are suitable options. Similar to electrophoresis, the transfer process uses an electrical charge to facilitate protein migration. The proteins move from the gel towards the positive electrode, where they adhere to the membrane.
- Cut the membrane to match the gel size and activate PVDF membranes with methanol (not required for nitrocellulose).
- Assemble the transfer sandwich:
1/ Sponge
2/ Filter paper
3/ Gel
4/ Membrane
5/ Filter paper
6/ Sponge
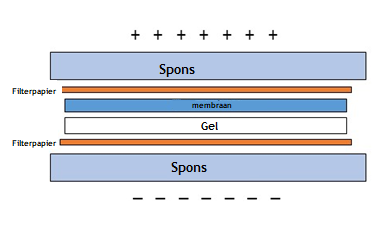
- Perform transfer using:
- Wet transfer: 100V for 60–90 min at 4°C.
- Semi-dry transfer: 20V for 30–60 min.
- Dry transfer: Follow the manufacturer’s instructions.
Before proceeding, you can check the protein has successfully transferred to the membrane. You can check the success of the transfer using Coomassie blue (Immerse the membrane in Coomassie Blue stain for 5–10 minutes) and Ponceau S (Briefly incubate the membrane in Ponceau S solution for 1–2 minutes) staining of the gel. Rince off the membrane and incubate in blocking solution. You can use the pre-stained molecular weight ladder as an initial check to compare the amount of protein on the PAGE gel and the membrane.
4- Antibody incubation and revelation
- Incubate the membrane in 5% BSA in TBST for 1 hour at room temperature.
- Incubate with the primary antibody (diluted in blocking buffer) overnight at 4°C with gentle shaking.
- Wash the membrane 3–5 times with TBST (5 minutes per wash).
- Incubate with secondary antibody for 1 hour at room temperature.
- Wash the membrane again 3–5 times with TBST.
- Apply the substrate to the blot.
Blots can be imaged immediately while still wet, or alternatively may be dried prior to imaging. Place each blot in a sheet protector or on a clean surface prior to imaging to prevent contamination.
| Categories | Products |
|
Antibodies |
|
|
Buffers |
|
|
Membranes |
|
|
Protein stain |
|